Saturday, December 1, 2012

Tiramisu: Separation of Variables

In lab, I study the morphology of rod-shaped bacteria, such as Escherichia coli, Vibrio cholera, Salmonella, and other fun bugs. I try hard to not bring work home with me, especially when I'm preparing raw dishes. When the dish calls for uncooked eggs, I'll go out of my way to buy caged-free. Laying hen cage confinement can increase Salmonella risk between five and twenty times*. If I'm a food snob, it's for selfish reasons.

My father makes a killer Tiramisu, but his recipe breaks a cardinal sin of cooking: he doesn't separate the eggs before whisking! When you whisk egg whites, you're actually denaturing proteins, which aggregate and form the stiff foam. For egg yolks, which are a lot fattier, whisking will instead emulsify the lipids (same thing happens in steamed milk). These distinct physical processes are also mutually exclusive. Lipids will prevent aggregation of denatured proteins. For dishes where the whites are cooked separately (such as meringues), egg separation is crucial. Still -- maybe my dad is right -- maybe since Tiramisu calls for the reunification of the egg for the final product, egg separation might be an unnecessary complication!

To test this hypothesis, I have to go against my word and bring research to my kitchen. I prepared two nearly identical Tiramisu dishes, with the only difference being the separation of eggs.

Parallel Tiramisu being prepared! Right: unseparated eggs; Left: separated eggs.

The result? Well, to zeroth order, I think the results are very similar in taste and appearance. There are two noteworthy distinctions: (1) It took way longer to whisk the combined eggs than the separated eggs. Easily three times longer. My arms are tired. If you have an electric mixer, then this isn't an issue. (2) The texture of the 'separated egg' Tiramisu is slightly thicker.

Parallel Tiramisu being prepared! Right: egg whites, egg yolks, combined egg whisked. Left: Separated egg whisking lead to a slightly grainier, thicker end result.


Although we can skip a step by whisking the egg whole, it actually makes the recipe preparation significantly longer without an electric mixer. Well, here's the recipe in its separated form. Combine the first two sentences if you do not want to separate eggs.
Tiramisu (6 dessert servings, ~1 hour prep time)
Ingredients
+ 4 eggs
+ ~400g Mascarpone
+ 7 Tbs sugar
+ 2 cups strong coffee, room temperature
+ One pack of Lady Fingers
+ Cocoa powder and Marsala wine (optional)
Preparation
Whisk† your egg whites until you have stiff peaks. Whisk your egg yolks with the sugar until you have ribbons. Gently fold the Mascarpone into the egg yolks, and then fold in the egg whites.  
Add 2oz Marsala to your room-temperature coffee. Make a layer of lady-fingers in your serving dish by very briefly submerging each cookie and placing it as depicted in the first image above. Add a layer of the whipped concoction. Add another layer of coffee-soaked cookies, and finish with a final layer of the egg mixture.  
Cover and refrigerate until ready to serve. Right before serving, sprinkle some cocoa powder on top. Enjoy!

(will update with a photo of served Tiramisu)

* Fun fact: the color of eggs is only a function of the hen variety. Hens with brown ears will lay brown eggs. Hens with white ears will lay white eggs.
 Fun fact number two: Hens have earlobes!
† Whisking is easier with fresh eggs.

Thursday, November 22, 2012

What to cook for your PI: Tomates Farcies Two Ways

You are more likely to cook for colleagues in academia than in industry. Between your living wage and basic nutrition requirements, cooking can be the most practical gift a graduate student can offer. Follow these cooking tips to make a good impression on your PI:
  1. Always use fresh ingredients and a recipe that calls for thorough cooking. Even if your PI is a microbiologist, she wont appreciate food poisoning. Leave your leftovers in the free-food area at work.
  2. Make sure the dish isn't notoriously time consuming. No amount of hand-prepared fresh pasta using whole-wheat that you spent the last two years growing will impress a PI who gets a whiff of how much time you took off research to make it.
  3. Choose a dish that pairs well with graduation. Hey... couldn't hurt.
  4. Avoid store-bought prepared foods. Your PI is high class, even if he wears jeans with holes and sometimes sleeps on his office couch. Any dish that 'looks' home made is more respectable than guac and chips. Wine is an exception to this rule, and Two-Buck Chuck is an exception to that exception.
I'm joining my PI and his family for Thanksgiving later today, and I'm bringing a couple of Crustic Baguettes and Tomates Farcies Two Ways - a French stuffed tomato recipe. Before sharing the recipe below, here are some possible Autumn dishes that would also work well*:  Hasselback Potatoes (or anything with taters), Bread Pudding, Beet salad, or a nice bottle of Malbec.


Tomates Farcies Two Ways (12 servings, ~1 hour prep/cook time)

Ingredients
+ 12 Tomatoes (not too ripe)
+ 6 garlic cloves
+ 2 yellow onions
+ Parsley
+ Butter, Salt & Pepper
+ Splash of White Wine or Vermouth
+ Parmegiano Reggiano
Farce Type I (traditional)
+ Ground Beef
+ Bread crumbs
Farce Type II (vegetarian)
+ 1 Leek (chopped, dark green discarded)
+ 2 Bell Peppers (seeded, chopped)
+ Mushrooms, one basket
+ Dried Italian Herbs

Preparation
Wash your tomatoes (see above note about food poisoning). Cut the top off each tomato carefully; they will be the tomatoes' hats! Again, carefully remove the seeds using a spoon, but do not remove the meet on the tomato wall. Sweat the tomatoes by salting their insides and turning them over while preparing the next paragraph. Also, start preheating the oven to 460F, 260C.
For either Farce, start by blooming the onions in melted butter over a pot (with high walls, since we're adding lots of ingredients). Once translucent, add the seeds and let the juice evaporate, then add the garlic and parsley. Promptly start adding the ingredients in the order they are listed under each type of farce, waiting a couple minutes between each ingredient 
Once the meat is cooked, or the veggies are softened, carefully stuff the tomatoes with the farce, adding enough to overflow slightly. Top them off with some Parmesan, add the hats, and throw them in a casserole dish, and throw that in the oven for twenty minutes. If possible, try to use a good looking casserole dish -- these tomatoes do NOT like being moved more than once. Enjoy.


*No, these are not all links to this blog. Sheesh.

Tuesday, October 16, 2012

Baguette Variations of the No Knead Bread: "Crustic Baguette"


Awhile ago I posted the link to the New York Time's no knead loaf. I've made this recipe dozens of times, and I still love it, but I think at this point my version has strayed significantly enough from the original that I can justify posting it here. Let's call it "Crustic Baguette" for now.

What are the main changes? I'm impatient, so I've removed the second rising time completely. Also, instead of making a rustic loaf using a dutch oven (which most of my friends do not have), the recipe now makes baguettes on a cookie sheet. Its faster and easier.

It's easy and a very forgiving recipe. Don't be discouraged if things get messy -- it will still taste delicious. Just don't forget the salt.

No Knead Baguette (makes two baguettes)
Ingredients
+ 3 cups all purpose unbleached flour
+ ¼ teaspoon yeast
+ 1¼ teaspoon salt*
+ 1 ¾ cups water
Preparation 
   The night before, dissolve the yeast in the water, and mix in the rest of the ingredients together in a bowl with a spoon until everything is incorporated. Then cover the bowl with a towel or plastic wrap, and leave it overnight.
   The next morning (at least eight hours later), it will have at least doubled in size and the surface will be dotted with bubbles. Using heavily floured surface and hands, get the dough out of the bowl and rip it in half. The surface of the dough should have enough flour not to be sticky, but try not to incorporate flour into the bread. As the name indicates, you should not knead the dough. Instead delicately shape each half into a long rod. I do this by gently squeezing, not pulling. Plop them on a cookie sheet (don't worry, doesn't need to be nonstick). The loaves will look kinda flat, but they'll rise in the oven.
   Preheat the stove to 450. Fill a loaf/cake pan or dutch over with water and put it on the bottom rack of the stove. By the time the oven is preheated, the water will be boiling, imitating the moist condition of professional baking ovens. Once the oven is preheated, score the baguettes with a knife, and throw them on the second rack of the oven. Bake for ~20-30 minutes, or until they look delicious. 
  * DO NOT CUT THE SALT: Literally every time I've made this recipe, I look at the amount of salt required and shake my head and think "No way that's way too much salt. I don't like as much salt as the average person. I'm watching my sodium intake. I can enjoy this bread with less salt. People have too much sodium in their diet, and I'm better than them. I'll just use half as much".  Then, lo and behold, the baguette just tastes of wet cardboard.

Monday, May 21, 2012

Hasselback Potatoes

Graduate school is a lot of work, but I've had the best time of my life since arriving at Stanford last September. I am still cooking tons, but there's been less time to post the recipes. Here's a short one on Hasselback Potatoes. They're basically potato chips glued at the base. It's not hard at all, and it's a crowd pleaser. I recommend using a smaller potato variant other than regular Russet potatoes for two reasons: since there are no garnishes, the potato's intrinsic taste & texture is going to feature prominently. Check out this cool site for potato varietal infographic. Second, other varietals tend to be smaller and hence cook more quickly.
Hasselback Potatoes
Ingredients
+ Potatoes (I used Yukon Gold potatoes, but red potatoes work well too)
+ Salt & Pepper
+ Olive Oil
Preparation
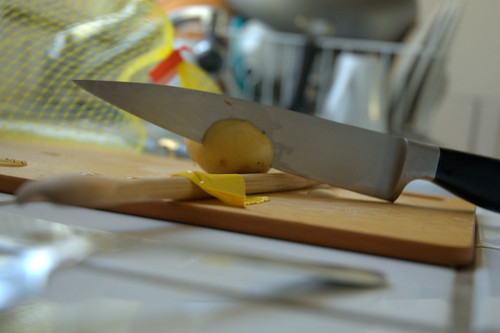
Preheat oven to 400F. Tape a chopstick or thin wooden spoon to a cutting board, as in the photo above. Start slicing the potato in thinly using long knife strokes (slice - don't chop). The chopstick will prevent you from chopping all the way through. 
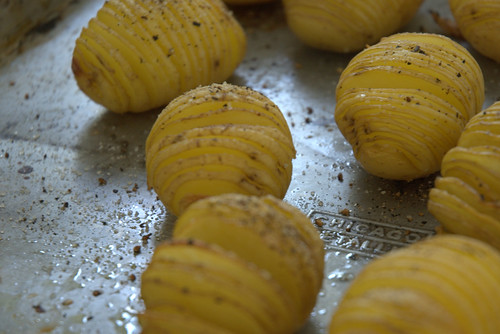
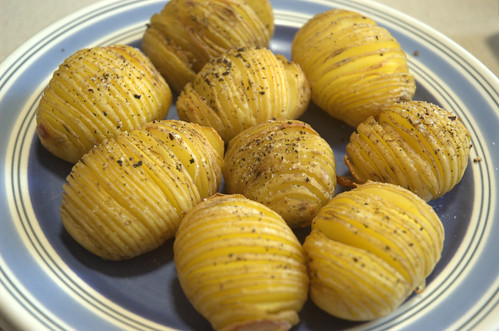
Place potatoes directly on the baking sheet and add a drop of olive oil on top of each potato, along with a healthy amount of salt and pepper. At this point, its normal for the peels to stick together. As it cooks, the peels will separate as in the photos below. Cook them until they start to brown, about one hour (start checking at 45 minutes). 
I did about four small potatoes per person, and served it with a salad. It was plenty of food.